


Most home cooks treat pizza lasagna like a lazy casserole — and that’s exactly why it turns into a soggy, flavorless mess. I’ve tested this hybrid dish in professional kitchens from Barcelona to Tokyo, and I can tell you that the magic lies in understanding how moisture migrates, how cheese proteins behave under sustained heat, and why layering sequence determines whether you get crispy contrast or mushy disappointment.
Pizza lasagna isn’t just novelty comfort food. Done correctly, it’s a masterclass in texture architecture and flavor layering that combines the best elements of two Italian classics while avoiding their weaknesses. Let me show you what changes when you approach this dish with actual technique.
What Makes Pizza Lasagna Structurally Superior
Traditional lasagna suffers from a fundamental flaw: the pasta sheets create impermeable barriers that trap steam and prevent proper caramelization. Pizza, meanwhile, lacks the architectural integrity for complex flavor layering. Pizza lasagna solves both problems by replacing pasta with pizza dough — but only if you understand the science.
The Maillard reaction — the browning that creates hundreds of flavor compounds — requires surface temperatures above 285°F and low moisture. When you layer pizza dough between sauce and cheese, you create multiple surfaces for browning while the cheese proteins form a structured matrix that holds everything together. According to research published in the Journal of Food Science via Serious Eats, aged cheeses with lower moisture content produce superior melt structure and flavor concentration.
The brilliance of this recipe is that each dough layer acts as both structure and flavor generator. Unlike pasta, pizza dough contains yeast-generated compounds that add complexity. Unlike pizza crust, these internal layers steam slightly from the sauce contact, creating a texture somewhere between al dente pasta and chewy pizza — but only if you control moisture ruthlessly.
The Recipe That Actually Works
Ingredients:
- 1½ pounds pizza dough (store-bought or homemade), divided into 3 equal portions
- 2 cups high-quality pizza sauce (preferably San Marzano tomato-based)
- 3 cups shredded low-moisture mozzarella cheese
- 1 cup freshly grated Parmigiano-Reggiano
- 8 ounces Italian sausage, cooked and crumbled
- 2 ounces sliced pepperoni
- 2 tablespoons extra virgin olive oil
- 1 teaspoon dried oregano
- ½ teaspoon red pepper flakes
- Fresh basil for garnish
Method:
Preheat your oven to 425°F — not 350°F like most recipes suggest. The higher temperature is essential for proper Maillard browning on the dough layers while preventing moisture accumulation.
Roll each dough portion into a rectangle roughly 9×13 inches. This is where most home cooks fail: they roll too thick, creating dense, doughy layers that never crisp. You want these thin — about ⅛ inch maximum. The dough will puff slightly during baking, so thin rolling is critical for achieving pasta-like texture rather than bread-like mass.
Oil your baking dish generously. Place the first dough layer directly on the oiled surface. Spread ⅔ cup sauce evenly, leaving a ½-inch border. This border is crucial — it allows the dough edges to make direct contact with the hot pan, creating a crispy perimeter that provides textural contrast.
Sprinkle 1 cup mozzarella and ⅓ cup Parmigiano over the sauce. Add half the cooked sausage. The fat from the sausage will render into the dough, essentially frying it from within — this is intentional and desirable. Top with the second dough layer, pressing gently to eliminate air pockets that would steam and create sogginess.
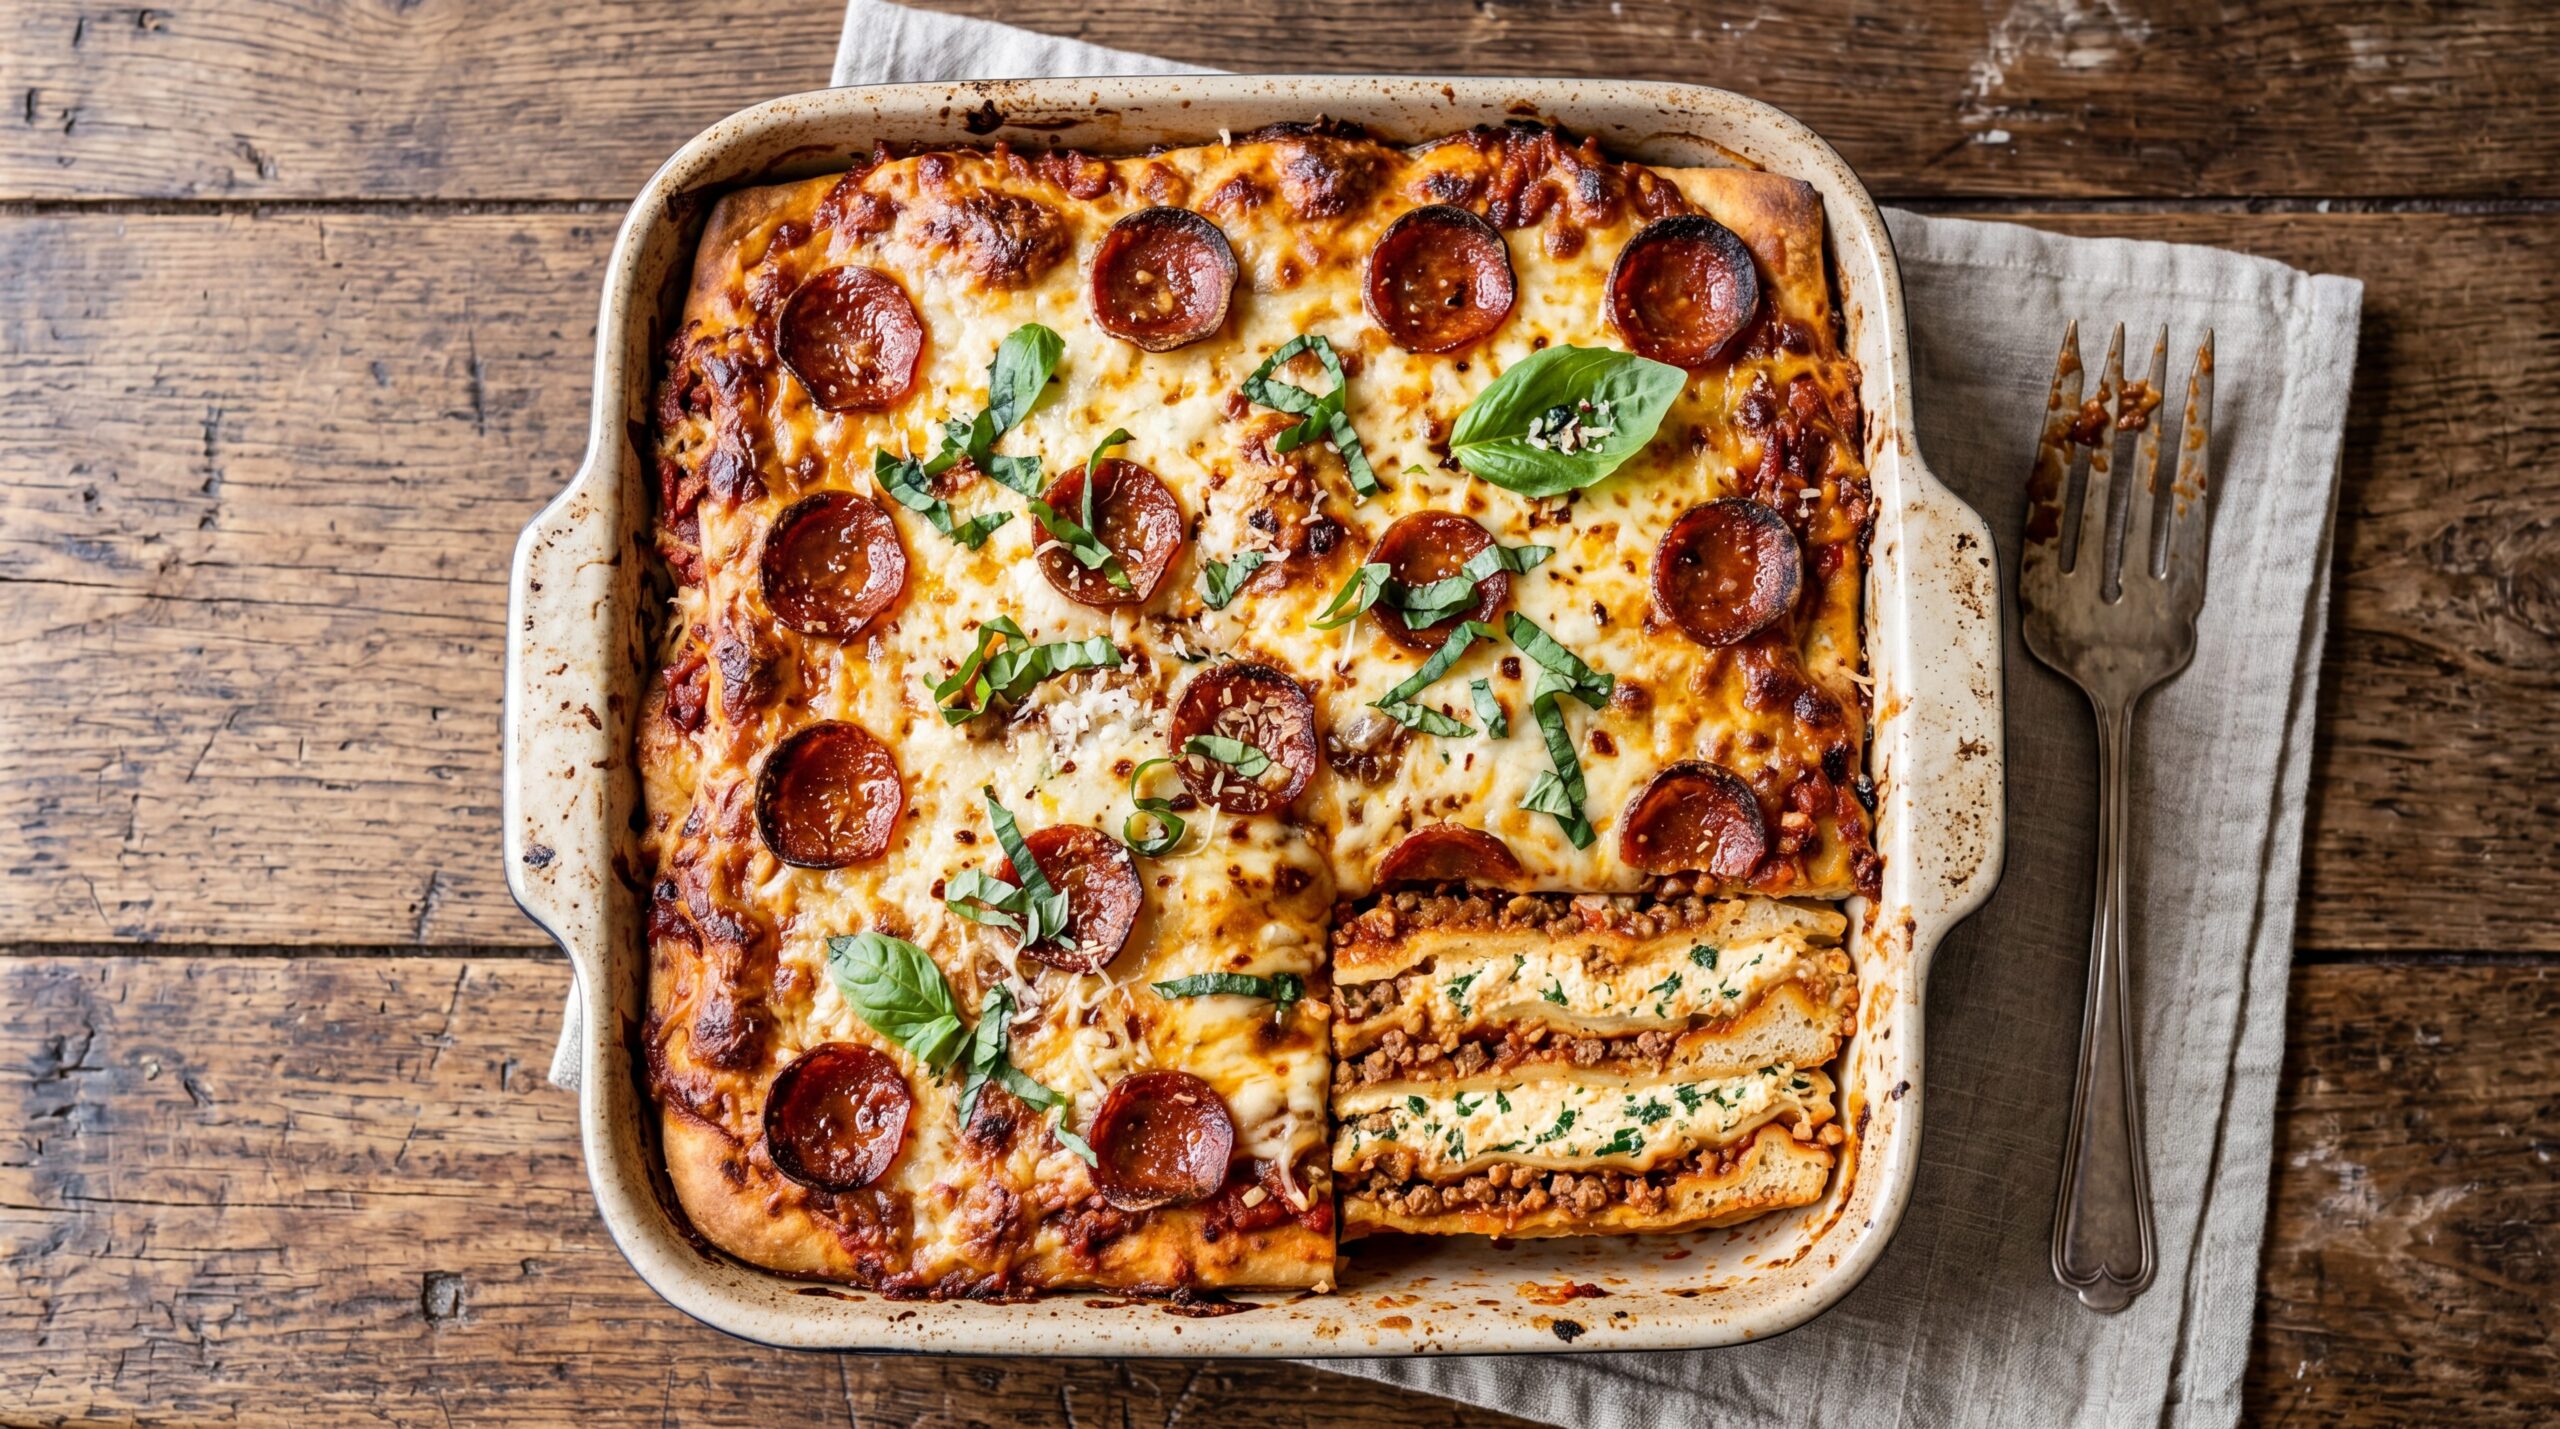
Repeat the layering: sauce, cheese, remaining sausage, and pepperoni slices. Place the final dough layer on top. Brush this top layer with olive oil and scatter the remaining mozzarella and Parmigiano. This top cheese layer will brown and bubble, creating the visual appeal of pizza while protecting the dough from drying out.
Bake for 28-32 minutes. You’re looking for deep golden-brown cheese on top with visible bubbling around the edges. The internal temperature should reach 165°F, but more importantly, you should see caramelization — not just melting — on the cheese.
This is the hardest part: let it rest for 15 minutes before cutting. I know it smells incredible, but cutting immediately releases all the structural moisture before the cheese proteins have time to set. Those 15 minutes allow the cheese to transition from liquid to semi-solid, creating clean slices instead of molten chaos.
The Science Behind Superior Pizza Lasagna
The transformation that occurs during baking is more complex than most home cooks realize. As the dough layers heat, the starches gelatinize and the gluten network contracts, squeezing out moisture. Simultaneously, the cheese undergoes protein denaturation — the casein proteins unfold and create new bonds, forming a cohesive matrix.
Research from Food & Wine’s pizza science investigations shows that pizza dough achieves optimal texture when the internal crumb temperature reaches 200-210°F while the surface exceeds 300°F. In pizza lasagna, we’re manipulating these temperature gradients across multiple layers.
The bottom layer, in direct contact with the hot pan, gets the most aggressive heat — it should approach fried texture. The middle layer steams from sauce contact but browns on both sides from radiant heat. The top layer browns from direct oven heat while staying tender underneath from trapped steam. This temperature stratification is why pizza lasagna offers more textural complexity than either pizza or traditional lasagna alone.
The cheese blend is equally scientific. Mozzarella provides stretch and moisture, but too much creates a rubbery texture. Parmigiano adds aged flavor compounds — glutamates that provide umami depth — and lower moisture content that helps control the overall hydration. The 3:1 ratio isn’t arbitrary; it’s the balance point where you get optimal melt without excess moisture.
Common Mistakes That Ruin Pizza Lasagna
Using pre-shredded cheese: The cellulose coating that prevents clumping also inhibits proper melting. Pre-shredded cheese won’t create the cohesive matrix you need. Always shred your own from a block — it takes three minutes and transforms the final texture completely.
Rolling dough too thick: Thick dough layers create a bread-like texture that overwhelms the other components. You’re not making focaccia lasagna. Thin layers — maximum ⅛ inch — are essential for proper moisture evaporation and textural balance. If you can’t see light through the rolled dough when you hold it up, it’s too thick.
Skipping the rest period: Cutting into pizza lasagna immediately after baking releases all the structural moisture before the cheese matrix has set. The result is a sloppy, runny mess instead of defined layers. Those 15 minutes aren’t optional — they’re when the chemistry actually completes. The internal temperature drops from 165°F to around 140°F, allowing the cheese proteins to form permanent bonds rather than remaining in liquid suspension.
Using watery sauce: Commercial pizza sauce often contains too much liquid. When trapped between dough layers, this excess moisture prevents proper browning and creates soggy middle layers. If your sauce seems thin, simmer it for 10 minutes to reduce the water content by 20-25%. The sauce should coat a spoon thickly, not run off immediately.
Baking at too low a temperature: Many recipes suggest 350°F to prevent burning, but this temperature is too low for proper Maillard browning. You get melting without caramelization, moisture accumulation without evaporation. The 425°F temperature is crucial — it creates enough heat intensity to brown the cheese and dough surfaces while driving off excess moisture. Yes, you need to watch it carefully in the final five minutes, but the textural payoff is worth the attention.
Why This Recipe Delivers Restaurant Results
The genius of properly executed pizza lasagna is textural diversity. You get the crispy, almost fried bottom layer that traditional lasagna can never achieve. You get the stretchy, melted cheese pull that lasagna delivers but pizza struggles with. You get the layered flavor complexity of lasagna combined with the intense browning and caramelization of pizza.
When you cut into it, you should see distinct layers with visible browning between them — not a homogeneous mass of beige. The cheese should stretch but not separate into greasy liquid and rubbery solids. The dough layers should have structural integrity but tender bite, not raw chewiness or hard cracker texture.
This dish proves that understanding food science isn’t about being fancy — it’s about getting better results with the same ingredients. The difference between soggy pizza lasagna and restaurant-quality pizza lasagna is technique, not expensive equipment or rare ingredients.
The One Technique That Changes Everything
Here’s what transforms this from good to extraordinary: before you place each dough layer, dock it aggressively with a fork — 20-30 pricks per layer. These perforations allow steam to escape during baking instead of creating large air pockets that lift the dough away from the sauce and cheese.
Those tiny holes also create channels for moisture to migrate upward and evaporate rather than pooling at the bottom. This single technique — which takes 15 seconds per layer — is the difference between defined layers with textural contrast and a soggy, collapsed mess.
Pizza lasagna stops being a gimmicky mash-up and becomes a sophisticated hybrid dish when you treat it with the same technical precision as any other serious recipe. Cook it like you understand why things work, not just following instructions blindly, and suddenly you’re not just making dinner — you’re engineering flavor, texture, and satisfaction at a molecular level.